Happy Halloween!!


Happy Halloween!!! 

I don't know about anyone else, but I am a huge fan of Halloween!!!  Part of it is the time of year~  Autumn always makes me happy.  The cool, crisp air, the lack of humidity, the tinge of fear that snow could fall at any time…  I love the holiday because it affords me a time to be silly and dress up and pretend that I'm still a kid, even though I have two kids of my own.  This year, we have followed my eldest daughters demands and we all have a costume that fits her theme of "The Wizard of Oz."  She is dressing up as Dorothy, my husband as the Scarecrow, myself as the Wicked Witch of the West (should I be worried that this is who she selected me to be?) and the baby is dressing up as a Flying Monkey.  We're one adorable and dorky family!


We've carved our pumpkins, we made a batch of awesome chex mix, attended some of the great events in the area and decorated the house with homemade fun-ness and generally enjoyed the holiday.  If you have kids, here's a great activity that you can do with them, that serves as a fun decoration for the house!

Bats and Ghosts


Ghosts:
Materials:
String
White Kleenex
Black Marker

Instructions:
Take 3 kleenex and lay them flat.  Wad up 2-3 kleenex and put them in the center.  Pull up the flat kleenex around the wadded up kleenex and tie a length of the string around, forming the head.  Let your child use the marker to draw on a ghost face.  Hang around the house!

Bats:
Materials:
Black construction paper
String
Glue Stick

Instructions:
Cut black construction paper into squares and triangles.  (you'll need 2 triangles for each square)  Roll squares into cone shapes and glue.  Glue triangles on for wings, and attach string to one end so the bat appears to be hanging.


Outdoor Ghosts

Materials:
White "kitchen-sized" garbage bags
Newspaper
String
Permanent Marker

Instructions:
Wad up newspaper and place inside garbage bag.  Tie knot below newspaper to divide head and body.  Tie string to top so you can hang bag from a tree.  Draw a ghost face on the head, and hang outside!  You'll enjoy seeing your child's ghost every time you drive up at home!

Holidays! [puff hat crochet pattern]

As you all know, the holidays are right around the corner, and I've got so much to do!

I've ceased buying gifts for everyone, in lieu of crafting wonderful presents that I've found people appreciate much more than those store bought options.  Last year, I didn't even ask people what they wanted, but instead, made a ton of items, threw them all into a cardboard box and let them pick their presents!  It was fun to watch them rifle through the box, trying things on and exclaiming at each other about how much they liked this hat, that scarf or these gloves.  This year, I'm even crafting toys for the important children in my life~ a fun venture, I think!

I also have a crafting project/gift idea that my daughter and I will complete~ the traditional cookie mix in a jar.  My daughter is 3.5 years old and loves to craft with me!  I think she'll have a blast making these jars for family and friends!

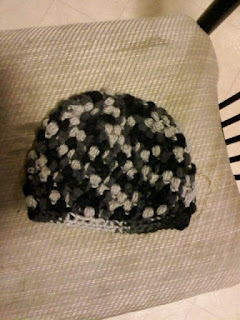
Tonight, I finished my first holiday present...  can't tell you who it's for, because they might be reading this blog and that would just ruin the surprise!!  I love love love the way that this hat turned out, even though I had to totally modify the pattern in order for it to fit my head.  So here's a picture of how it turned out, along with my modified pattern!

Puff Hat


Copyright 2010-2012 LiLu Studios: This Crafting Life, by Lori Steffens. {http://www.thiscraftinglife.com/} Make it, Wear it, Love it, but above all, Share it, don't Sell it!

Hook: Size K

Abbreviations
PS- Puff Stitch
slst- slip stitch
sc- single crochet
ch- chain

Special Stitches:

Puff Stitch:
  1. Wrap the yarn over the hook, insert the hook below the chain. Wrap the yarn over the hook and draw through. There will be 3 loops on the hook.
  2. Wrap the yarn over the hook, insert the hook below the chain. Wrap the yarn over the hook and draw through. There will be 5 loops on the hook.
  3. Wrap the yarn over the hook, insert the hook below the chain. Wrap the yarn over the hook and draw through. There will be 7 loops on the hook.
  4. Wrap the yarn over the hook, insert the hook below the chain. Wrap the yarn over the hook and draw through. There will be 9 loops on the hook.
  5. Wrap the yarn over the hook and draw through to secure puff stitches at the top.

Pattern:
Chain 5, join.
R1: *PS, ch1* Repeat 6 times, sc in top of beginning PS to join.
R2: *PS, ch1, PS, ch1 in next ch1 space.*  Repeat around (12 PS/ch1).  SC in beginning PS to join.
R3: *PS, ch1, PS, ch1 in next ch1 space.  PS, ch1 in next ch1 space.* Repeat around (18 PS/ch1).  SC in beginning PS to join.
R4: *PS, ch1, PS, ch1 in next ch1 space.  PS, ch1 in next ch1 space.  PS, ch1 in next ch1 space.* Repeat around (24 PS/ ch1).  SC in beginning PS to join.
R5-R15: *PS, ch1 in next ch1 space.* Repeat around (24 PS/ch1).  Sc in beginning PS to join.
R16: *2 sc in next ch 1 space.*  Repeat around (48 sc).  SLST in beginning sc to join.
R17-R18: Sc in each sc around.  (48 sc).  SLST in beginning sc to join.
Finish off.

Welcome!

You have been lucky enough to stumble upon my happy little blog! My hopes are to share with you all my many craft/personal/business ventures. For those of you who don't know me, I am a mother of two, avid crafter, and photographer. While photography is my passion, I have many other hobbies that I partake in, such as crocheting, scrapbooking, sewing, beading, jewelry making and graphic design. 
What will you see in this blog?
Everything from things I've crocheted and their patterns, to photography, and even craft projects that I've done with my children.  There will also probably be commentaries on my life and interests, activities and general mayhem that comes with my everyday life. 

So, enjoy!!
~Lori